Wednesday, 4 September 2013

First Day of the Rest of my LIFE ... KITCHEN!!!

Tonight for 10-months, every first Wednesday evening, I will be taking a cooking course.  Not just any cooking course, it will be in Librije's Atelier.

What is Librije? 

Librije is a restaurant (http://www.librije.com/?language=en), not just any restaurant, it would be the only 3-star Michelin restaurant in the Netherlands (the other one is planning to close done, not because of lack of customers, but the chef wishes to retire).  What is even more interesting was the restaurant got its first star in the first year it opened, and caused a 5-month waiting period to have a table ... !!!  Now, wait for half a year for lunch ... yes, it took as that long to wait for one a couple of years back.


Not only do they have the 3-star restaurant, they also have the other restaurant, Zusje van Librije (http://www.librije.com/40/librijes-zusje/), which got its 2nd star last year (the restaurant is part of a hotel, which was once a women's prison). 

These restaurants, hotel and cooking school are owned by the couple Jonnie & Therese (aka as Trees in her childhood ... yes, but in Dutch trees are bomen), who are locals of the region of Zwolle ... and lives just a block or two from our place (rubbing elbows? nope, just us trying to rub theirs ... hehehe) !!!  

Been to both, and was really impressed with it ... the Zusje when it was still a 1-starred, but still as good and impressive as the older sister.

Enough of the hype about the restaurant and their school, I am not getting paid for it, but actually paying the month's salary to take this course (http://www.librijesatelier.nl/dutchatelier/librije-s-workshops/04-09-2013-passie-voor-koken-deel-2 ... too bad it is only available in Dutch).


The course was (or is) last year's birthday gift from the "guinea pig".  He thought that I would love it (which I DO ... no not saying it as a wedding, I DO).  However, I finally realised, that though the gift was for me ... it seemed that this gift for me would eventually (in the long-run) will be more a gift to himself .... mmmm <tight-lipped and one corner higher than the other corner> .... HAHAHA!!!

Who cares, I would be learning the scientific way of cooking, from one of the best restaurant I. This country.  Learning the rules, without going through the trial and error of what matches (well, I would still go through it ... I have not been very well-known to be a stickler to rules ... rather, I would follow the essence of the rule).  Then understanding what wines would be best to be match with dishes ... no more rules of white for fish & other sea creatures and red for meats etc ... will have more of the wines of the wines of the sommelier, Therese (yes, the wife is the sommelier ... I thought she just got the position she is the wife, but I tell you, she can pick good wines ... she has wines from the Netherlands ... this country which barely has any sun, she was able to find a vineyard that produces the right grapes to make her wines ... LOVE IT).

What do you think would happen ... would I be inspired to create more lavish dishes ... or would I end up wanting to have take-away as it would be easier?  Will I be the artist as these chefs are these days ... or will I become a mere copier of famous artworks ?  Questions to be answered, when we go through .... !!!

Some notes about the city of Zwolle

Zwolle from Google maps ... the inner city (which I fell in love with, as the man who lives in it) is shaped like a star, surrounded by water and still maintains portions of the old walls of the inner city.  Take a walk in it (even virtually), as the city is one of the best kept secret from tourist, who only knows Amsterdam or Rotterdam.  Zwolle is maintains its old charm, being a city that is more like an over-grown village, where everyone knows each other and everyone recognises or related to someone you know ... it is the past in the present Netherlands!


Sunday, 1 September 2013

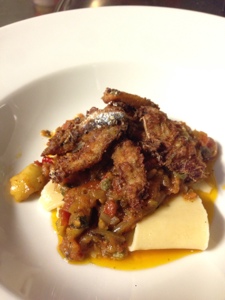
30 Minute (plus minus) Dinner: Sautéed Tomatoes, Capers & Olives withDeep Fried Anchovies fillets.

8 o'clock and dinner was still not prepared ... I haven't had any idea what to cook.  I wanted to do some Spanish style cooked sardines with the anchovies I bought this morning, but the pressure cooker was no where in sight ... Hidden away by the fireman, who is busy with the Safety day event.

Simplicity & speed were the main idea for dinner.  I had fresh anchovies, leftover homemade dried lasagna pasta (from last week dinner with friends - http://asiantune.blogspot.com/2013/09/vegetarian-lasagna-with-homemade.html), tons of tomatoes from last week too, the usual olives and capers in the cupboard. 

Started sauteing the finely chopped large onion, with a tablespoon of pureed garlic on a warm-hot pan (but not smoking) under a medium to high fire, until caramelised which took about 5-10 minutes. Then I added the finely chopped 8 medium-sized tomatoes (just use the proportion of 1:3 of onion to tomatoes' size) plus a small bouquet of thyme & finely chopped twigs (2-3) of fresh basil which would have around 10-20 good sized leaves, then lower the fire to medium to medium-low fire and let it slowly cook for another 5-10 minutes, covered & stirring (and tossing if you can) once every 3-5 minutes.  

When the mixture is slight dry, add capers 3-4 teaspoon of capers (one tsp caper per two tomatoes proportion) and 5-10 pieces of pitted olives, add a tsp or two of the capers bath and same for the olives ... This would give more flavour for the sauce. Lower the fire to medium to medium-low and let it simmer for another 2-3 minutes, after which, add more olive oil and split the olives. Simmer further for another 3-5 minutes, but under low to very low fire.

While you cooking the sauce, boil water and cook the pasta.  My homemade lasagna pasta cooked around 7 minutes, which would be al dente. 

As the pasta and sauce are cooking, fillet the anchovies and wash them.  Dry a bit by rolling on a tea towel or kitchen paper.  I prefer the kitchen paper, as the tea towel would need to be washed afterwards, unless you like the fishy smell <wink>.

There is a video of me filleting an anchovy.  It seems that tablets & smart phones does not support this format.  You can view it via your computer or laptop.

Season the anchovies fillet with salt and ground/powder plus a bit of corn starch (to make it a bit more crispier).  Heat up a good enough the oil to about 140-160C, to deep fry the fillets. Make sure your oil is HOT, but not smoking, and DO NOT OVER-CROWD.  Deep-fry until crisp.


When you are starting to put the fillets in the oil, remove the sauce from the fire ... At the same time, drain the pasta and plate, then drizzle with some oil to prevent it from drying up and sticking to each other and plate.  I would even drizzle some oil first on the plate, if not the sauce.
Then complete the ensemble by topping it with the crispy anchovies.


Eating it in parts or mixing them together is a choice you have to discover, because I just love them in both ways!!!

The leftover sauce, I am planning to have with some toasted or fried bread for lunch ... !!!  


Vegetarian Lasagna with Homemade Lasagna Pasta

Last Saturday was one of the most cultural evenings for the last 10 years, because we had two guests at home (colleagues of mine).  One of them was an Indian woman raised and educated in India, and my good friend (another colleague) is a Surinamese woman of Indonesian origin. Then my bf whose Mom comes from the South of the Netherlands and a Dad with Friesian origins, but born and raised in Batavia (old colonial name Jakarta) and studied in the Netherlands ... Then me ... <pointing upwards> read the profile ... HAHAHA!!!

What else would happen when you have a group who has been raised to "LIVE to EAT" and not "EAT to LIVE", it is a day of cooking ... But the funny thing was that we cooked a dish that was "indigenously" NOT ours ... Lasagna ... But definitely OUR VERSION of a vegetarian lasagna!  

The challenge was that day, our Indian friend was on her vegetarian period.  So, we had to make one without the usual ingredients that I would never miss in any dish ... MEAT ... I AM A CARNIVORE!!!  What even added to the challenge was that my Surinamese friend wished that we do not use any olives and capers ... SAY WHAT?!?!? Yes, EXACTLY!!!  However, they did not have any issue with the use of cheese ... YES ... There, I can have some flavour ... And we could use herbs ... YES again!!!

We started making our lasagna pasta ... <flashback> When I first made it in 2011, I mixed a cup of wheat flour to one egg and seasoned it with a pinch of salt.  Kneaded it until, it was possible to have it rolled ... Yes, I did it all by hand ... Even rolling the pasta dough, then I was able to make some pretty decent fettuccine and ravioli with mushroom, cheese and some Iberico ham in them ... And the "guinea pig" (aka BF) loved it !!!!

Fettuccine with meat sauce
& blue cheese
Spinach cheese Ravioli
with Tomato Sauce
<back to present time> So, I tried to start mixing the same proportion of two cups of flour and two eggs plus a pinch of salt (or more like a fourth of a teaspoon). Didn't find any whole wheat flour, but thought that the self-rising flour wouldn't make any difference ... Little did I know that self-rushing flour would be making the dough drier ... Anyway, I mixed it but the darn thing ended up to be just little pebble-like rather a whole clumpy rock.  I added an extra egg, for each cup, which made is very sloppy ... Then my sweet Indian lady friend, who had decades of experience of making chapati (they seem like thin bread like tortilla) ... She whack the dough into submission and eventually it got mixed into a clumpy rock-shaped dough.

When we got the dough, I pulled out from the cupboard the guinea pig's last Christmas gift ... The pasta maker attachment for the Kitchen Aid mixer he gave me for the first Christmas together ... Yes, he is giving me appliances, but it was my choice ... I literally wanted it, but now it is becoming a routine ... CRAP ... Sometimes getting what you want is not always going to make you smile ... Yes, I am an ungrateful B*TCH ... HAHAHA ... That is why he LOVES me .... Because I am being ME!

Back to the story ... My trusted friends-colleagues assisted me in the process of putting the dough into the machine, which gave us more than we needed ... And even four extra sheets of lasagna (forgot to photograph them when it was fresh, and these ones are cracking now ... Which I would use for another small lasagne with MEAT!!!


Showed this to a true-blue born and raised Italian colleague of mine (nope she was no 2nd or 3rd or nth generation migrant) ... and she noted that this was too thick.  I got my first failing mark from her ... Boo Hoo Hoo ... Well, that is why I said ... OUR VERSION ... HEHEHEHE!!!!  However, she thinks that I can really cook, so she promised to give me real flour to be used for pasta making (will add that when I find out what it is.,.She told me but I forgot...HEHEHEHE). 

For the filing filling of the lasagna, using the same dough mixture of 2 cups (self-rising) flour and 4 medium-sized eggs (use only 2 medium-sized eggs for a regular whole wheat flour), I used the following:
* 2 medium length zucchini (aka courgettes in Dutch), slices in sheets;
* 2 medium-sized onions, finely chopped;
* 3 paprika (aka bell-pepper in the US & capsicum in Germany & Australia) cut in paysanne (in small cubes), I tend to use a green, a yellow & a red ... It just gives more colour;
* 1 kg of really riped tomatoes, finely chopped or even pureed but the liquid kept, you need to dry this out in the cooking process;
* 250 gms of spinach
* 150 gms sliced champignon mushrooms
* 150 gms sliced shiitake mushrooms
* 5 medium-large cloves of garlic or one of the single bulb type, crushed; 
* 1/2 tbs fresh leaves of thyme (if you have the dried type, I usually tripled or even quadrupled the amount);
* two sets of 2-3 twigs of fresh basil (which would have around 10 leaves per twig) which are finely chopped;
* 1-2 tbs dried oregano (an extra tablespoon wouldn't hurt ... hehehe);
* a tub of ricotta cheese (I would have used mozzarella, but forgot to buy and got this one in the freezer);
* a big tub of cottage cheese;
* a cup of roughly grated Parmesan cheese. 

Note: The cheeses were only used when I started layering, and did not mix it while cooking.
This is how the onion, garlic and 
tomato mixture should look like.
  • heat up a pan, a good-sized one since the kilo of tomatoes are going to be in it and you would be stirring a good deal of the cooking process.
  • when the pan is warm enough pour in a good amount of oil, around 5 tbs, that leaves a small puddle in it;
  • put in the finely chopped onions & crushed garlic, caramelised, then follow it with the tomatoes.  I would keep pan open to dry up after a bit faster, but making sure to stir to prevent it to burn;
  • throw I the mushroom and slightly stir them in the mixture;
  • then a bit lesser liquid, I would thrown in the paprika, herbs and spices, followed with more olive oil. 
  • Allow to simmer further until the sauce is thicker than it started.


Drizzle the baking pan bottom with oil and the sauce, the layer up:
  1. lasagna sheet;
  2. sauce again;
  3. chopped basil leaves;
  4. spinach leaves;
  5. courgette sheets;
  6. cheeses (ricotta, cottage & Parmesan)
  7. repeat until you have only enough sauce & cheese to top everything. 
Bake the everything in a preheated oven at 160C for 15-20 minutes.  I usually turn the oven on, when I start preparing my ingredients, because I have a pretty big oven. If your oven is the size of a typical microwave oven, I would turn it on when I start preparing the sauce.

While waiting for the veggie lasagna to bake, I grilled some halloumi and steak (tips in making the perfect steak - http://asiantune.blogspot.com/2013/08/garlic-ways-to-store-them-plus-steak.html)

It took us a good hour or an hour enough to make, had the lasagna and grilled halloumi cheese for my sweet but powerful armed chapati expert.  For us carnivores, we had an extra slice of steak!!

  
We (the three of us) were able to achieve the challenge ... Creating fresh pasta ... Vegetarian dish we three never done (or maybe not) ... Learning from each others' experience and expertise!!!

Oh, the bf & I loved it so much, that we went to the in-laws (mine) and shard the leftovers with them ... And his father asked what it was called ... The sign that he liked it ... my mother-in-law loved it too!!


Monday, 19 August 2013

Homemade Babi Pangan Sauce

As a kid, there was always one dish I always love ... Chinese sweet sour pork ... Or my Chinese friends would call "Gu Lao Rou".  They are always something that would make me happy ... As long as it is the real thing.  

So, One day, I was craving to make some sweet sour sauce and was experimenting on mixing different ingredients, instead of the usual ingredients to make a thin but sticky sauce.  Decided to mix tomato ketchup, some orange juice, a bit of flour and salt and pepper to further season, then boiled them together and stirring with a wire whisk regularly ... It tasted good, but it was not the sweet & sour sauce that i wanted to make. What came out was Babi Pangan sauce ... It was such a surprise, because I see everyone buying the package which they mix with water and then cook, and could not imagine these simple ingredients to be the sauce that is a staple in every Dutch Chinese restaurant. 

The proportions are 3:1 of tomato ketchup to orange juice, and just a third or quarter the porting of the juice for the flour, this is only to make the sauce thicken quicker, as the tomato ketchup tends to have this already.  Then season accordingly.  

Did that sound confusing?  Let me list it down differently ... Hehehe:
3 tbs tomato ketchup
1 tbs orange juice
1 tsp flour 
Salt & Pepper (optional)

I usually just dump all these ingredients in a big mouth bottle, with the lid closed, shake to mix completely (remember this tip in http://asiantune.blogspot.com/2013/07/another-left-over-honey-mustard-sauce.html).  Then pour it in a cool & lightly greased pot or pan, put over a medium fire to slowly cook the mixture.  Remember to stir (or I should say, whisk, as using a wire whisk is better) to keep the sauce smooth, otherwise, it would end up a bit "clumpy".

This is the consistency which you should achieve.


Note
* The seasoning can be placed in the bottle or when you are cooking.
* Acidity of the tomato ketchup plus orange juice can make the sauce a bit too sour, if it is, i suggest to add a bit of sugar or honey or artificial sweetener. 
* it is possible to not use any flour, but your cooking time would take longer, since the only thickener would be from your tomato ketchup.
* if you plan to use cornstarch (aka corn flour), just use half of the amount that is used for flour (got this link from a friend - thanks Chic - which gives the differences of the two http://answers.yahoo.com/question/index?qid=20061018115130AA5BRCB)

Found out that there were a few variations that can be done with this simple sauce, here are some I have tried:
* Sautée crushed garlic and onions (and some crushed chillies, if you like your sauce to have a bit of bite ... You know how much you can put in  ... If not, use only a pinch, because it is easier to make it spicier than to soften it) on medium-high to high fire.  When the onions & garlic have been caramelised, pour in the sauce mixture and cook further;
* Add a teaspoon of soya sauce, to the ingredients in the bottle, which gives it a bit darker tone.  If you are to follow this variation, remember that soya sauce is salty already;
* Adding Worcestershire sauce.  This very unique sauce just gives a light spicy flavour that enhances the tangy taste of the Babi Pangan sauce. 

To the reader ... Hope you are enjoying what you are reading ... If you do ... You know what to do!!! 😉

Friday, 16 August 2013

30-Minute (or less) Dinner: Steak with Cheese Sauce & Corn and Peasallwith a Twist

Yes, it is steak again ... Got a very good deal for really GOOD rib-eye steaks.  However, having steaks the same way every weekend is not for me!  This is the reason, I always recycle my leftovers ... Hehehe!!!

What can you do with good steak ... Nothing much, as it is good on its own.  So, I just fried them straight on very warm/hot but not burning mixture of butter and oil.  Fry the steak and let it rest ... Remember the rule, a minute per side per centimeter of steak for a medium rare steak, if medium-well add half a minute per side to a minute. 

Before I continue, I discovered this butter for frying by Campina ... It is like heaven in a foil ... Butter that you can cook with (not the Croma fat, that doesn't have the butter taste) but not give you burn marks due to the liquid in the butt ... Ooopppsss, darn auto-correct, I meant BUTTER.  Get it, because you would really LOVE IT not the butt ... Mmm ... !!!

Back to cooking the steak, which I did nothing much for the usual.  The magic was the sauce I made to go with it.  It isn't the usual cheese sauce that uses flour ... Mine is made from regular ingredients we have at home ... Here are the steps to make it ....

  1. Melt some butter about 50gm (25gm regular butter & 25gm of the Campina cooking butter, if you do not have it, just wear long sleeves when you cook) and 2-3 tbs (1 tbs = 15 ml) under medium to medium-high fire;
  2. When butter-oil is warm enough (the butter would turn a bit brown, but should NOT reach smoking ... When it smokes, please start all over again) spoon in a teaspoon or two of mustard (1 tsp = 5 ml) - used a regular mustard but I think it would have been better to use a strong one - whip it hard (yes, whip using a wire whisk and not just a spoon);
  3. Add in a tablespoon or two of thick cream (if you do not have cream use mayonnaise, but use half).  Whip it further and hard, because this might split;
  4. Whip in further a tablespoon or two of olive oil if the mixture is too thick;
  5. Continue whisking and add a teaspoon of lime (or lemon); 
  6. Take the pot out from the fire and immediately add 2-3 tablespoon of finely grated Parmesan cheese, while putting the cheese whisk vigorously to mix the cheese into the emulsion. 
  7. Let this rest until you are about to use it.   
 NOTE: If you have to reheat, whip it, or you run the risk of making the cheese stringy.
My advise is do the saus first, then the steak.  After doing the steak, use the same pan to do the corn with peas with a twist.  

What is the twist?  I used baby corn ... No fresh ones, because I am using up everything in the cupboard ... HAHAHAHA!!!  Yes, the twist was brought about by the situation and not because I wanted it ... If I had regular corn, I would have used it.  

How did I make it?
1. Using the same pan where I cooked the steak (Why? This pan has a flavored oil already.  Why waste it?), I threw in some garlic ... Yes the same garlic which I blogged about in "http://asiantune.blogspot.com/2013/08/garlic-ways-to-store-them-plus-steak.html" ... I used the one I the bottle ... Fried in in medium fire until it turned a but brown, flipping it once in a while;
2. When the garlic is brown ... This is what they call "caramelised", because you can taste the garlic being sweet ... The sugar of the garlic comes out ... Getting back, when the garlic is caramelised add the frozen peas (yes, I have them in the freezer, when I don't have any veggies for the meal, like now) about half a cup (1 cup = 236 ml) of frozen peas;
3. Let the peas defrost, which will take about 3-5 minutes;
4. Then add a can of baby corn (net 425 gm; drained 250 gm can), cook it further for 2-3 minutes and not forgetting to stir it every 30-45 seconds;
5. Season with pepper, no need to put salt because your cheese sauce would be salty enough.

I was surprised to have this cheese sauce, but having the veggies not too strong compliments the mixture of steak, cheese (with mustard) sauce. 

Got other idea with steak .... Please let me know, still have a few in my freezer!!!


Monday, 12 August 2013

Recycling Left-Over Dimsums - Lunch

Morning after a dinner party.  The kitchen filled with pots and pans to clean, and more to put into the dishwasher.  Then you open you fridge and see the left-over dimsums you have stacked away than throwing them away.  I saved them already, then I have to eat them, but who wants to have the same thing that you ate last night, aside from cold pizza (seriously, after a hard night of drinking, I just have to have a cold pizza for breakfast) ... HEHEHEHE!!!
My eyes scanned the fridge, then centred on one of the containers ... It is the one that holds the shrimp dumplings. Thoughts ran through my mind ... Throw the in the nuke machine and make them look like this ....

Or peel of the rice flour wrappers and make some sandwich filling out of them ... !!! 

Mmmm .... The new revived shrimp dumplings became the sandwich filling:
  • peeled off the rice flour wrapping of the dumplings, and had 20-30 (I think);
  • placed the peel shrimp dumpling in a food processor with a medium sized onion (like it more "oniony" in flavour, then use a bigger one ... You have to have onions, if not use a good bunch of chives);
  • then add a 2-3 tablespoons of cream or mayonnaise & a teaspoon of lemon (2 tsp for lime) ... Adding the rind is optional;
  • run the gadget ... Go Professor Gadget!!!
  • season with salt and pepper as desired.

On a bit of diet now, decided to use it as a topping on my rye bread.


Recycling Left-Over Dimsums - Dinner

Had the party, but always prepared too much.

What do I do ... Eat it!  However, do I steam them again and wait at least half an hour before the core of the dumplings a warm?

Nope, all you can do is put water in your microwaveable container, wherein the dimsums have been stored (makes it easier to nuke them).  I would say for every five (5) to seven (7) dumplings for every tablespoon (just use your regular soup spoon, no need to be too precise. It is just to steam them) of water.  Nuke them for a minute on a 900 watt microwave. 

Half a spoonful of water for two siopao/bapao (or what some call stuffed steamed breads) for the same minute of nuking.

Serve with very light soya, lemon & Worcestershire sauce or just place sweet & chili sauce, it is your call!!!

Viola! 


Sunday, 11 August 2013

Instant Dimsum Dinner Party

Love dimsums, these are steamed dumplings ... Asian dish.  However, they are just too tedious to make ... Actually, my family never made these wonderful dish, as they were always better to buy them cheaply, but not in taste.

The funny thing is that they are not suppose to be dinner dishes as they are usually served in the morning till mid-afternoon.  However, not a full-blooded Chinese, which gives me the good excuse to eat it WHEN I WANT IT .... HAHAHAHA!!!

Anyway, all you need are e following:
1. A rice cooker;


2. Wooden steamer that would fit your rice cooker, and;


3. Wonderful company, then you have your dinner party!!!


The oriental side of me love this with Jasmin or light tea, but the influence of Europe in me, would never pass up to have a reason to drink dry white wine.  My experience in Chinese restaurants, they would always give me sweet white wine with it.

Another thing you should never forget when eating dimsums (or some call it Asian dumplings) is a mixture of very light soya sauce and lemon (or lime) juice.  Sometimes, I would mix a bit of chillies in this sauce or Worcestershire or both!!!

Enjoy!!! 


Thursday, 8 August 2013

Left-Over Babi Pangan ... What to do?

For the non-Dutch or those not familiar with the Indonesian dish "Babii Pangan".

It is deep fried pork belly (I think Babi stands for pork in Bahasa Indonesian), chopped in 1,5 cm strips and served with a thick sweet & sour sauce and the Southeast Asian version of pickled sauerkraut, which is called atchara. 

Atchara, on the other hand, is pickled with not just cabbage, but with julienne carrots plus small onions.  This, I find, is very good with any fried dish, but surprised that it is served with a sweet & sour sauce, which makes it disappear if you do not look for it. 

Had this good portion of Babi Pangan, which was sitting in the fridge, and I hate eating the same dish too often.  Since we were fresh from work, the easiest way would just cook the rice then heat the Babi Pangan and mix it, but like I said, I prefer (said hate earlier ... HAHAHAHA ... Trying to tone it down now ... HEHEHEHE) to have a newer dish.

Here is the variation to such dish .... Prepared to cook rice (the proper Asian-way, not the Western way of draining it before serving ... Yes, for those who haven't heard it, most Europeans I met boils rice in abundant water and after a period of time of boiling they drain it and we've it.  Guess, this is why they seem not to mind the "crunchy" type that I usually tasted from their cooked rice.

What is wrong with that procedure is that you follow a fixed cooking time, and usually from the experience with the previous rice.  Not all rice are alike, they may be the same variety, but their cooking time can still differ and like pasta, you cannot leave it in liquid too long lest you want them soggy.
Before telling you the variation of the Babi Pangan dish, need to talk about how to cook rice properly.

First, pick a pot that is too thin that heat is transmitted on the food too fast, pick one with has a thickness ... Like around a cm or two, at most. Put the rice and wash and fill with water.  

The important question is how much water!!! Level the rice and touch the top of it with your middle fingertip ... Not your finger nail tip!!! The first line from the tip of your middle finger should be the level of your water.  

Put the pot on a medium to high fire and let it boil, with then lid closed.  This usually takes about 5-7 minutes.  Then when it start boiling, take out the lid and stir (this is my extra step, but you can just let it boil further),after which, you put the fire to medium to medium-high (or even just in medium-low), until it is like a lava boiling with that  little holes in the rice and the water bubbling up. When you reach this  stage in the rice, put the lid on the pot and lower the fire to low and cook this for 15 minutes.  If the rice is still wet, cover the pot and set the fire to very low for another 5 minutes.

Haven't cooked rice that often, so will have to update this when I have photos or even video to assist how it looks like ... Please be patient ... And let me know that you are waiting for the photos/video. 

Now, back to the Babi Pangan rice ... Do the same procedure to cook the rice, but this time throw in the Babi Pangan and even add in some frozen peas.  Just note that if you add frozen peas, make sure the water is from until half from the tip of your finger to only covering your rice.

Serve it with the pan-fried garlic, which was mentioned in "Garlic ... Ways to store them ... plus Steak with pan-fried garlic!!!".


Monday, 5 August 2013

Basics or Must Haves in the Kitchen ... Ingredients!!

When I migrated it was a bit of struggle to find out the basics that I needed to cook, because it seems that back as a kid everything was at home.  Also, being in a very "macho" society a boy is not expected to learn to cook, as they would marry and the wife is expected to fill the role of the cook.

When I lived n my own in this newly adopted country of mine, where it maybe one of the most densely populated per square kilometer, space is gold and keep the stuff out of sight is another, I tried my best to take a great deal of consideration to these two points (space & esthetics), making my kitchen renovation budget a third of the amount for the whole apartment.

With just a cabinet for food storage, not including the fridge & freezer (they are the two lowest doors on the left), what can I "hoard"?
I thought of a few ingredients, that I must have (reason will be noted when I write about the basics that I learned in cooking ... From all the trials and errors, and unexplainable facial expressions from my most beloved ex-guinea pigs - another term for ex-bfs ... HAHAHAHA):
  • oil - Have you ever heard about cooking with out it? I am sure you would definitely not have a wide array of recipes ... Or are you still in the Stone Age or are you just nuking them all the time?
  • onions - I know there are more than just one onion kind, which is why I keep the white ones ... And buy the others when needed or mixing a bit of raw onions when you need them to be stronger.
  • garlic - Yes, GARLIC.  They just complement any dish ... I still have issues when I do not have the, in my dishes, it just misses something ... And I do not mean the taste (see tips on ways to store them in http://asiantune.blogspot.com/2013/08/garlic-ways-to-store-them-plus-steak.html). 
  • creme fraiche (or cream substitute) - Need I say why?
  • vinegar - it is not just for cooking, but good for cleaning too. 
  • soya sauce - If I cannot have all the types, I would have the dark one as you can dilute it.  I am not talking about the "ketchap" type which seems to originate from the Indonesian kitchen (will have to investigate this further). 
  • pepper corns - They can be used as crushed or whole, from the kitchen to the table. 
  • bay (laurel) leaves - Have them in dried form, but if you get them fresh then be able to dry them ... Go for it!
  • flour - I use this to thicken sauces, it clots lesser than cornstarch.  Also mixed with bread crumbs, egg and spices, makes the best meat breading. 

Then I have my personal basics:
  • lemon (or lime) juice - It just enhances the flavour, mainly the salty taste without making it too salty. 
  • tomatoes (or purée/paste) - Sautéing with tomatoes give that soft sharpness, plus adding colour to the dish. If you are using the purée/paste, makes your sauces a bit thicker without using starch (or flour). 
  • citrus juice - I usually have orange juice at home now.  When I was in the tropics, we would use pineapple juice.  It doesn't have the same acidity level, but creates a twist to the Western recipes that calls for orange juices as an ingredient.
  • mustard - Lately, I found out how diverse this simple condiment, because I used to use it on,y for my hotdogs or making homemade mayonnaise. They come from the ready-made type, from the bit sur tasting to the strong (wasabi or horse radish type) taste, from the smooth ones to even the grainy ones.  I usually try to keep a small can of the powder form, wherein I can adjust the strong flavour or soften it .... And even better make variations to how to mix it. 
  • milk - Being from the tropics fresh milk is a bit hard or expensive to keep (aside from the fact that it keeps only for a few days in the fridge, a great of majority of Filipinos are lactose intolerant ... And I am leading that list ... HAHAHAHA), my alternative is coffee milk (or we would call evaporated milk - this is real milk where 50% of the water is taken out ... So just add in the water to restore to a regular milk ... And using this kind, you can store them longer too, which is why this is a must have for me. 
  • coconut cream & milk - You can always use the regular milk or cream, but having the coconut variety just gives the right twist to regular dishes, or the proper taste for recipes that require coconut cream or milk in them.
  • fish sauce - Just like the well-known Thai dishes, Filipino or any Southeast Asian dish uses this salty condiment.  Some say this condiment would require getting used to, but how would I know when I have grown-up with this always on the dinner table, with salt, pepper, soya sauce

Of course, I did not list the usual basics, like:
  • coffee - yes, I am a coffee drinker ... !!!
  • tea - rarely touch the stuff, but always have to have one, at least.
  • sugar - let us be realistic what house does not have any sugar??? 
  • honey - just to have it, since it tastes better on tea ... Yeah, when I drink it ... Hehehe!!! Also, it is good for those days when I get the cough.
  • artificial sweetener - when you don't want the calories ... Yes, they can cause cancer ... So, does breathing!!!
  • butter - never been to a family home that doesn't have this one ... Or at least margarine. 
  • salt & pepper - another one that a home is never out, right?

The list will definitely change on my mood for the season, like the time I was into baking ... All the baking ingredients and paraphernalia were a MUST.  So, nothing would be final, even those things written in stone can be grounded away ... !!!

Just keep reading and let me know what you enjoy!!!

Sunday, 28 July 2013

Another Left-Over ... Honey Mustard sauce Recycled!!!

Last night, made too much salad dressing, the homemade honey mustard sauce.  What else to do with it ... Pasta sauce!!!  No, I did not just warm up the sauce and threw it on the pasta (or the other way around, as what I usually do.

Decided to crushed and finely chop two garlic cloves and half a big onion ... Threw them on a hot pan with 3-4 tbs of oil in it.  While sautéing the garlic and onions in medium to medium high fire, added a knob of butter. 

When the garlic and onions were properly sautéed, I added half a cup of frozen peas.  When they were partly defrosted (it usually takes 2-3 minutes), I added the left-over honey mustard sauce and 50-75 ml of (very) dry white wine.  Let it simmer for 3-5 minutes then add frozen shrimps (I am using the 16/20 sizes) and let it further to simmer until the shrimps turn completely orange, then remove frame fire.  

By taking the sauce with the shrimps from the fire, you can avoid the shrimps from becoming rubbery and cook perfectly.

While you are cooking, time your pasta to be ready by the time you finish your pasta ...  The sauce is approximately done in 15 minutes including the shrimps' cooking time.  Start doing your MATH ... HAHAHAHA!!!

For this shrimp pasta, we had some ready-made lamb burgers which I grilled ... And still the salad leaves dressed with balsamic vinaigrette with a touch of honey.  For every one part of balsamic vinegar, I have 2-3 parts of olive oil (make sure you are using EXTRA VIRGIN ... The darker the better) plus half a part of honey ... The honey just gives a softer sweet touch to the vinaigrette ... Season further to taste with salt and pepper.

One tip I can share is when mixing salad dressings, use old cleaned bottles ... Pour the ingredients in it, screw the cap and shake till you get the proper emulsion. 


And this was dinner!!!


Left-over Roast beef slices and Frozen shrimps

It's is still warm in the Netherlands, but got some thing that I grew up with to ease the heat wave .... AN ELECTRIC FAN!!!

Now a bit cooled off, decided to cook a bit, but still using the bags of salads I have bought last Friday. Got inspired when I was watching BBC's Saturday Kitchen (just love this program, aside the reason to stay in bed longer on a Saturday Morning ... HEHEHEHE), and made a creamy honey mustard sauce where I cooked my frozen shrimps until it turned orange, but not before I slit them in the middle.  Then topped the our salad plates with pan-fried roasted beef slices, which I got from the deli.

How I made the creamy honey mustard sauce-dressing. 

  1. coarsely chopped half a big onion;
  2. crushed and finely chopped the 4 pieces of garlic;
  3. placed the garlic then the onions on a heated pan with 3-5tbs of olive oil plus a tbs of butter, where you have pan-fried the roast beef slices;
  4. add a tbs or two of flour, when the onions have turned glassy & mixing it well;
  5. followed by a 100 ml of heavy cream (if you do not have cream, I'd use mayo about 3tbs), mixing it well again;
  6. followed by a tbs and a half of mustard after mixing it in, add half a cup to a cup (around 150ml) of apple juice (orange juice would be fine, but using pineapple juice would make it sweeter which means lesser honey) and stir well, then follow it with a tbs and a half of vinegar (this it to have a bit of sharpness in the sauce and cut the too creamy flavour);
  7. add tbs or two of honey, depending on the degree of sweetness you are comfortable with on your salad, then add the shrimps which are slit in the middle and cook them until they turn orange ... When this happens, turn off the fire and let it cook further on its own heat.  
Note:
* make sure you cook this in low or low-medium fire, to have the sauce just simmer and not boil;
* cooking time would be around 10-15 minutes;
* when serving an extra drizzle of olive oil & salt and pepper.


Saturday, 27 July 2013

Too Warm to Cook ... !!!

It is official. The Netherlands has a heat wave ... July 2013. The news is stating that the last time we had it was in 2006!!!

After having it now for two weeks, the houses being constructed to keep the heat in the houses .... Which is not helpful when you have to cook ... CRAP ... !!!  

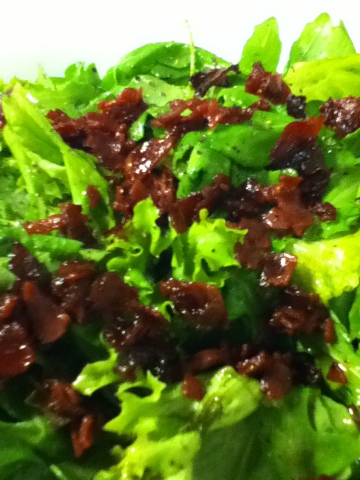
So, decided to buy a bag of 2 kilos of salad ... A kilo of lettuce melange (just a mixture of different kinds of lettuce leaves) and another kilo of ruculla leaves (just love it's bitter after taste). The next is what dressing and meat to match for lunch and dinner!!!

LUNCH
  • Lettuce melange
  • Ruculla 
  • Home made Honey Mustard 
  • Fried smoked horse meat bits (didn't want bacon, so decided to use the left-over smoked horse meat and fried it like bacon). 

HOMEMADE HONEY MUSTARD
  • 3 tbs honey;
  • 1 tbs mustard; 
  • 1 tsp lemon juice: 
  • 3 tbs olive oil;
  • a pinch of salt & pepper
NOTE: Ease up on the salt, if you will add something salty in the salad

Monday, 22 July 2013

Getting in tune with social media!!!

After more than 10 years out of the advertising world, now I am trying to get in tune with the blogging social media!!!

Hopefully, I can start posting my recipes and tips that I can share to the newbie like me!!!

SOON TO COME!!!